
UniRac SolarMount™ Module Mounting

System Components
Once you've
selected your PV modules and planned your installation layout, you're ready to choose
SolarMount components.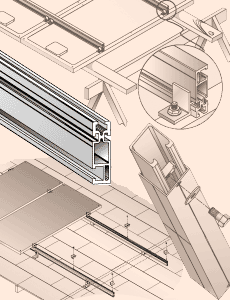 We will certainly help you with this, but the following will familiarize you
with the selection process and components.
Our Sizing and Ordering publication (PDF, 92 KB) will guide you through selections for specific PV module makes, models, and quantities.
Please call 888-826-0939 for current pricing
Ensure a SolarMount installation that complies with the Uniform Building Code by following Our Code Compliant SolarMount Installation Document (PDF, 1773 KB). This document includes PE certification and covers SolarMount design and assembly, with an emphasis on wind loads. Give it to your building inspector for review.
SMR Rail Sets
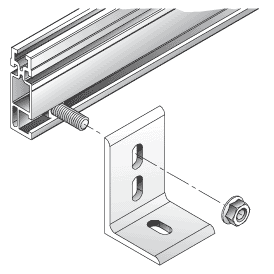 SolarMount's third-generation extruded aluminum rail is the most versatile yet.
Sets include 2 rails (model # = length of rails in inches), L-feet, and hardware to attach feet to rails. See diagram at left.
IMPORTANT NOTE: Lag bolts are no longer provided with SolarMount rail sets. To select the right lag bolts for your installation, consult our document SolarMount Lag Bolt Specifications (PDF, 11 KB)
![]()
CT Top Mounting Clamps
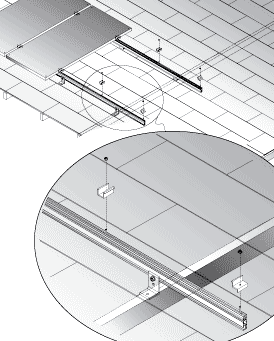 Top down assembly is ideal for Plug and Play PV modules. An entire array can be
assembled and wired where they're installed, on the roof, for example.
The continuous, slotted rails provide the ultimate in adjustability. No more redrilling holes or repositioning footings.
On pitched roofs, mount rails either parallel or perpendicular to the rafters.
When should you choose top mounting clamps?
The use of top mounting clamps is generally easier when flush mounting to a roof. Always use top mounting clamps when flush mounting to standoffs. If using bottom mounting clamps with L-feet, follow the installation manual carefully to make sure footing slots are accessible during final installation.
![]()
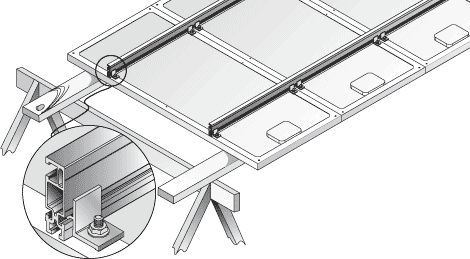
If an installer prefers to mount panels to rails before final installation (to facilitate wiring, for example) bottom mounting clips work well. They attach to either side of the rail, allowing maximum versatility. These examples below cover common situations. In each case, clips attach to mounting holes of the facedown modules.

Example 1: For a long panel-rail assembly to be flush mounted, use end-mounting holes and face the footing bolt slots outward. During final installation, the slots are easily accessible.

Example 2: An installation using low-profile tilt legs (TLL models) also needs outward facing footing bolt slots. On the lower end, the position of mounting holes in some PV modules allows clips to be reversed for even better positioning, as shown here. At the raised end, you can employ a mounting hole away from the end of the module.

Example 3: Whenever footing bolt slots of both rails can face the same way (as in this arrangement for TLH high-profile tilt legs) foot spacing will exactly match the distance between module mounting holes.
![]()
TLH High Profile and TLL Low-Profile Leg Kits
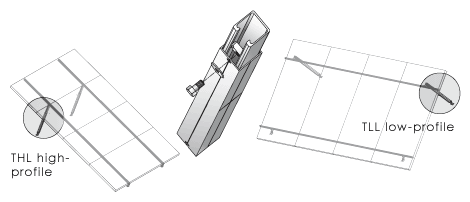 Strut-in-tube style tilt
legs quickly adjust to the precise tilt angle required. High-profile and
low-profile series each offer three leg lengths so that you can adjust to
exactly the tilt angle you want, up to 60 degrees from the horizontal, without
cutting or drilling from the job site.
![]()
Standoffs
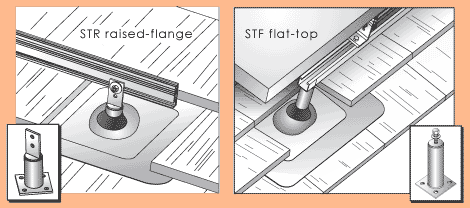 Standoffs are used whenever flashed installations are required—with tile roofs,
for example. All standoffs—3, 4, 6, or 7 inches tall—are compatible with
Oatey®
No-Calk™
flashings and other non-collared flashings. STR raised-flange
standoffs replace standard L-feet and fasten directly to SolarMount rails.
STF flattop standoffs support strut stringers that fasten to standard
L-feet, a typical technique on large flat roofs.
Sets include 1 standoff and two lag bolts (3-1/2 x 5/16"). Flattop standoffs also include hardware to attach stringer to standoff.
![]()
Splice Kits
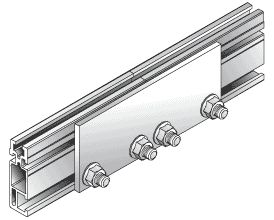
SP splice kits join the rails end-to-end in long low-profile installations. Each set contains two splices plus all the necessary hardware.
![]()
